These instructions are based on the standard "Rounders" template in Blogger. It should work with any standard template that has a solid header across the top. In Dots, for example, the header is only on the side bar so this approach would not work.
Step 1: Upload whatever picture you would like to use to the internet. For this, I found the easiest place was on Picasa - just click Photos at the top of your gmail page or go to http://picasaweb.google.com/home.
Step 2: Open your blog, sign in, and click Customize in the top right corner. Under Layout, click "Edit HTML".
Step 3: Do not let all the HTML junk here intimidate you. You can ignore most of it - you are looking for one specific item. Scroll down until you see this:
/* Blog Header
----------------------------------------------- */
#header-wrapper {
background:$titleBgColor url("http://www.blogblog.com/rounders3/corners_cap_top.gif") no-repeat $startSide top;
margin-top:22px;
margin-$endSide:0;
margin-bottom:0;
margin-$startSide:0;
padding-top:8px;
padding-$endSide:0;
padding-bottom:0;
padding-$startSide:0;
color:$titleTextColor;
}
You will be replacing the italicized link with a link to your picture.
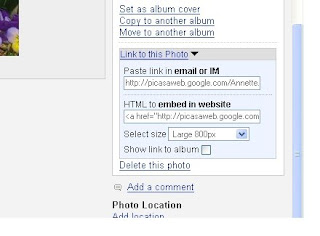
Step 4: Go back into Picasa, click on your uploaded photo and click "Link to this Photo". Select size Large.
 Step 5: Select the HTML to embed in website. Copy and Paste it over only the italicized part of the above. It will look like this:
background:$titleBgColor url(< href="http://picasaweb.google.com/[username]/[folder]/ photo?authkey=CtiTjzgr4aQ#5213797577318411122">
< src ="
SFshRc7bK3I/AAAAAAAABZI/5PetUjBddcc/s800/[image].JPG"
/>) no-repeat $startSide top;
margin-top:22px;
Step 6: Delete only the RED portion of the above. Now it will look like this:
background:$titleBgColor url("http://lh4.ggpht.com/[username]/SFshRc7bK3I/AAAAAAAABZI/
5PetUjBddcc/s800/[image].JPG") no-repeat $startSide top;
margin-top:22px;
Step 7: Click Preview. Your blog should open in a new window and you should now see your image in the header. However, it might still be too small. You can adjust the height if needed (see Step 8). If you are happy with the way it looks now, click Save Template and you are finished.
Step 8: To adjust the height of the image, just enter the height in pixels that you would like after the semicolon like this (300 pixels for example):
background:$titleBgColor url("http://lh4.ggpht.com/[username]/
SFshRc7bK3I/AAAAAAAABZI/5PetUjBddcc/s800/[image].JPG") no-repeat $startSide top;
height: 300px;
margin-top:22px;
Step 9: Click Preview again to see how the height looks. You can go back and adjust Step 8 until it looks like you want it to. When you are happy with it, click Save Template and you are done.
Good luck! I know this may seem a bit complicated if you have not programmed in HTML before, but if you find the relevant section and only adjust these specific items then it will be easy to do.

2 comments:
thank you - I will look into pimping my blog too!
re backgrounds - I haven't tried here, but on ebay I used to use backgrounds from here
http://www.hellasmultimedia.com/webimages/default.htm and use body background=whatever the url in pointy brackets.
This looks great. Thanks for posting it. If I decide to change my template, I'll know just where to come for help.
I do most of my learning related to the computer through trial and error too:)
Post a Comment