After a very long hiatus, I am back and will be posting new pictures and projects soon.
Where have I been these long months? Mostly at home, but busy getting ready for our new baby, getting things wrapped up at work so I could take maternity leave and then getting used to having a new baby at home. Our little one is two months old now and we have settled into a good routine so I can get back to updating my blog.
Showing posts with label Blogging. Show all posts
Showing posts with label Blogging. Show all posts
Friday, July 3, 2009

Thursday, June 26, 2008
Informative Blogging Topics
I have been thinking about what I could possibly post up here that would not make me feel like I am just talking about myself all of the time. The ideas that came into my mind are similar to the how-tos that I have listed below. I wrote those because I hoped they would be helpful to people. Now, I am trying to figure out what other topics might be helpful.
Here is what I have thought of so far:
* Gimp Tutorials
- Basics of resizing images
- Changing the background color
- Basic image enhancements
* Blogging
- How to add widgets
- How to use Google Analytics or other statistical information to track blog hits
- Suggestions for promoting your blog
Do you have any other suggestions? Leave me a comment and let me know what you would like to learn about!
Here is what I have thought of so far:
* Gimp Tutorials
- Basics of resizing images
- Changing the background color
- Basic image enhancements
* Blogging
- How to add widgets
- How to use Google Analytics or other statistical information to track blog hits
- Suggestions for promoting your blog
Do you have any other suggestions? Leave me a comment and let me know what you would like to learn about!
Saturday, June 21, 2008
How to use a blog reader
I love to read lots of blogs - everything from friends, friends of friends, people I find through Etsy, random blogs I find. For a while, I would just go through each of them every day or so and see if something new had been posted. The more blogs I found, the more time consuming this because. Also, there are a lot of people who blog very irregularly so I would stop looking and miss new fun posts.
Recently, I discovered Google Reader. This is a great way to compile and subscribe to all of the blogs that you read and see when something new is posted. I know there are a lot of other options out there to do this as well.
If you would like to start using this, here are the steps that I followed (it is so easy)!
1. In Gmail or Google, click on Reader to get set up and log in.
2. On any blog that you see, just click on Subscribe. In Blogspot, at the bottom is will say "Subscribe: Posts (Atom)". Then, follow the on-screen instructions.
That's it - you are set up. Now, you just need to log in to reader to see what is new! I have my blogs organized by topic - Friends, Family, Etsy, etc. This seems to work well for me.
Feel free to test it out by subscribing to my blog!
Recently, I discovered Google Reader. This is a great way to compile and subscribe to all of the blogs that you read and see when something new is posted. I know there are a lot of other options out there to do this as well.
If you would like to start using this, here are the steps that I followed (it is so easy)!
1. In Gmail or Google, click on Reader to get set up and log in.
2. On any blog that you see, just click on Subscribe. In Blogspot, at the bottom is will say "Subscribe: Posts (Atom)". Then, follow the on-screen instructions.
That's it - you are set up. Now, you just need to log in to reader to see what is new! I have my blogs organized by topic - Friends, Family, Etsy, etc. This seems to work well for me.
Feel free to test it out by subscribing to my blog!
Friday, June 20, 2008
Adding Pictures to Your Blog Header
I will start out letting you know, for the record, that I came up with this approach on my own by trial and error and that there is quite likely a better way to pimp your blog out on the internet somewhere. That said, I like the way it turned out and I like the flexibility to put up a picture that I like without bringing in all the other stuff that would come with a whole new template.
These instructions are based on the standard "Rounders" template in Blogger. It should work with any standard template that has a solid header across the top. In Dots, for example, the header is only on the side bar so this approach would not work.
Step 1: Upload whatever picture you would like to use to the internet. For this, I found the easiest place was on Picasa - just click Photos at the top of your gmail page or go to http://picasaweb.google.com/home.
Step 2: Open your blog, sign in, and click Customize in the top right corner. Under Layout, click "Edit HTML".
Step 3: Do not let all the HTML junk here intimidate you. You can ignore most of it - you are looking for one specific item. Scroll down until you see this:
/* Blog Header
----------------------------------------------- */
#header-wrapper {
background:$titleBgColor url("http://www.blogblog.com/rounders3/corners_cap_top.gif") no-repeat $startSide top;
margin-top:22px;
margin-$endSide:0;
margin-bottom:0;
margin-$startSide:0;
padding-top:8px;
padding-$endSide:0;
padding-bottom:0;
padding-$startSide:0;
color:$titleTextColor;
}
You will be replacing the italicized link with a link to your picture.
Step 4: Go back into Picasa, click on your uploaded photo and click "Link to this Photo". Select size Large.
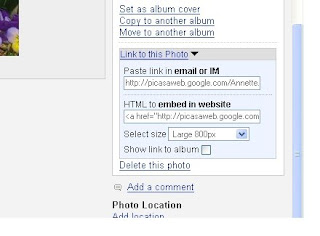 Step 5: Select the HTML to embed in website. Copy and Paste it over only the italicized part of the above. It will look like this:
background:$titleBgColor url(< href="http://picasaweb.google.com/[username]/[folder]/ photo?authkey=CtiTjzgr4aQ#5213797577318411122">
< src =""http://lh4.ggpht.com/[username]/
SFshRc7bK3I/AAAAAAAABZI/5PetUjBddcc/s800/[image].JPG"
/>) no-repeat $startSide top;
margin-top:22px;
Step 6: Delete only the RED portion of the above. Now it will look like this:
background:$titleBgColor url("http://lh4.ggpht.com/[username]/SFshRc7bK3I/AAAAAAAABZI/
5PetUjBddcc/s800/[image].JPG") no-repeat $startSide top;
margin-top:22px;
Step 7: Click Preview. Your blog should open in a new window and you should now see your image in the header. However, it might still be too small. You can adjust the height if needed (see Step 8). If you are happy with the way it looks now, click Save Template and you are finished.
Step 8: To adjust the height of the image, just enter the height in pixels that you would like after the semicolon like this (300 pixels for example):
background:$titleBgColor url("http://lh4.ggpht.com/[username]/
SFshRc7bK3I/AAAAAAAABZI/5PetUjBddcc/s800/[image].JPG") no-repeat $startSide top;
height: 300px;
margin-top:22px;
Step 9: Click Preview again to see how the height looks. You can go back and adjust Step 8 until it looks like you want it to. When you are happy with it, click Save Template and you are done.
Good luck! I know this may seem a bit complicated if you have not programmed in HTML before, but if you find the relevant section and only adjust these specific items then it will be easy to do.
These instructions are based on the standard "Rounders" template in Blogger. It should work with any standard template that has a solid header across the top. In Dots, for example, the header is only on the side bar so this approach would not work.
Step 1: Upload whatever picture you would like to use to the internet. For this, I found the easiest place was on Picasa - just click Photos at the top of your gmail page or go to http://picasaweb.google.com/home.
Step 2: Open your blog, sign in, and click Customize in the top right corner. Under Layout, click "Edit HTML".
Step 3: Do not let all the HTML junk here intimidate you. You can ignore most of it - you are looking for one specific item. Scroll down until you see this:
/* Blog Header
----------------------------------------------- */
#header-wrapper {
background:$titleBgColor url("http://www.blogblog.com/rounders3/corners_cap_top.gif") no-repeat $startSide top;
margin-top:22px;
margin-$endSide:0;
margin-bottom:0;
margin-$startSide:0;
padding-top:8px;
padding-$endSide:0;
padding-bottom:0;
padding-$startSide:0;
color:$titleTextColor;
}
You will be replacing the italicized link with a link to your picture.
Step 4: Go back into Picasa, click on your uploaded photo and click "Link to this Photo". Select size Large.
 Step 5: Select the HTML to embed in website. Copy and Paste it over only the italicized part of the above. It will look like this:
background:$titleBgColor url(< href="http://picasaweb.google.com/[username]/[folder]/ photo?authkey=CtiTjzgr4aQ#5213797577318411122">
< src ="
SFshRc7bK3I/AAAAAAAABZI/5PetUjBddcc/s800/[image].JPG"
/>) no-repeat $startSide top;
margin-top:22px;
Step 6: Delete only the RED portion of the above. Now it will look like this:
background:$titleBgColor url("http://lh4.ggpht.com/[username]/SFshRc7bK3I/AAAAAAAABZI/
5PetUjBddcc/s800/[image].JPG") no-repeat $startSide top;
margin-top:22px;
Step 7: Click Preview. Your blog should open in a new window and you should now see your image in the header. However, it might still be too small. You can adjust the height if needed (see Step 8). If you are happy with the way it looks now, click Save Template and you are finished.
Step 8: To adjust the height of the image, just enter the height in pixels that you would like after the semicolon like this (300 pixels for example):
background:$titleBgColor url("http://lh4.ggpht.com/[username]/
SFshRc7bK3I/AAAAAAAABZI/5PetUjBddcc/s800/[image].JPG") no-repeat $startSide top;
height: 300px;
margin-top:22px;
Step 9: Click Preview again to see how the height looks. You can go back and adjust Step 8 until it looks like you want it to. When you are happy with it, click Save Template and you are done.
Good luck! I know this may seem a bit complicated if you have not programmed in HTML before, but if you find the relevant section and only adjust these specific items then it will be easy to do.
Blog revamp
Today I decided to play around with the HTML on my blog layout. I found that I could add my own images to the header and sidebar sections. You will see my Hyde Park tulips peaking out at the top of the header and the ceiling from the Grand Lisboa Casino in Macao over to the right. I am working on finding something more than boring gray for the background, but have not had much luck yet. If you are reading this and the background is a more interesting color, I have had success. If not, then, well, not. Maybe I will be able to find a how-to on the internet somewhere.
It has been a lot of fun digging into the HTML for the template and trying to figure out what the programmers were doing and how I can adjust it without breaking it. If you are interested in learning how to do the same thing, just let me know and I will be happy to provide a tutorial.
It has been a lot of fun digging into the HTML for the template and trying to figure out what the programmers were doing and how I can adjust it without breaking it. If you are interested in learning how to do the same thing, just let me know and I will be happy to provide a tutorial.
Subscribe to:
Posts (Atom)

